It is not a secret that Windows doesn’t look good on high-resolution, high DPI monitors and multi-monitor setups. Microsoft has tried to solve this issue several times with updates, but things are still not as good as they should be.
So, although it has been six years since Windows 10 came to the market, users have to do a lot of manual tuning to make visuals look good on high DPI monitors.
This is where display scaling comes in. Let’s look at how you can scale the visuals on Windows to suit your display better.
What Is Display Scaling?
Display scaling refers to adjusting UI elements such as images and text, so they look good on your display. On high DPI monitors, display scaling aims to make the text appear sharper, and images look crisp.
This all sounds good on paper, but Windows leaves a lot to be desired when it comes to display scaling.
Traditionally, programs scale their visuals according to the pixels present. For instance, on a 1080p monitor, the software scales to map its visuals to roughly two million pixels. On a 4K monitor, the same visuals would have to adjust to eight million pixels.
And this is where issues start to pop up.
First, because the textual elements have to map to individual pixels, they tend to look much smaller on high DPI displays. So, readability takes a hit.
Second, visuals don’t scale well if you run multiple monitors, especially if the monitors are of different sizes and resolutions.
To alleviate the issue associated with per-pixel scaling, Microsoft has introduced Bitmap scaling. Bitmap scaling works just like a digital zoom. Essentially, Windows takes the visuals and spreads them out on the display. You can imagine how this might result in a loss of clarity and detail.
Thankfully, if you are having display scaling issues, you can tweak things manually to your liking.
Display Scaling on a Single Monitor
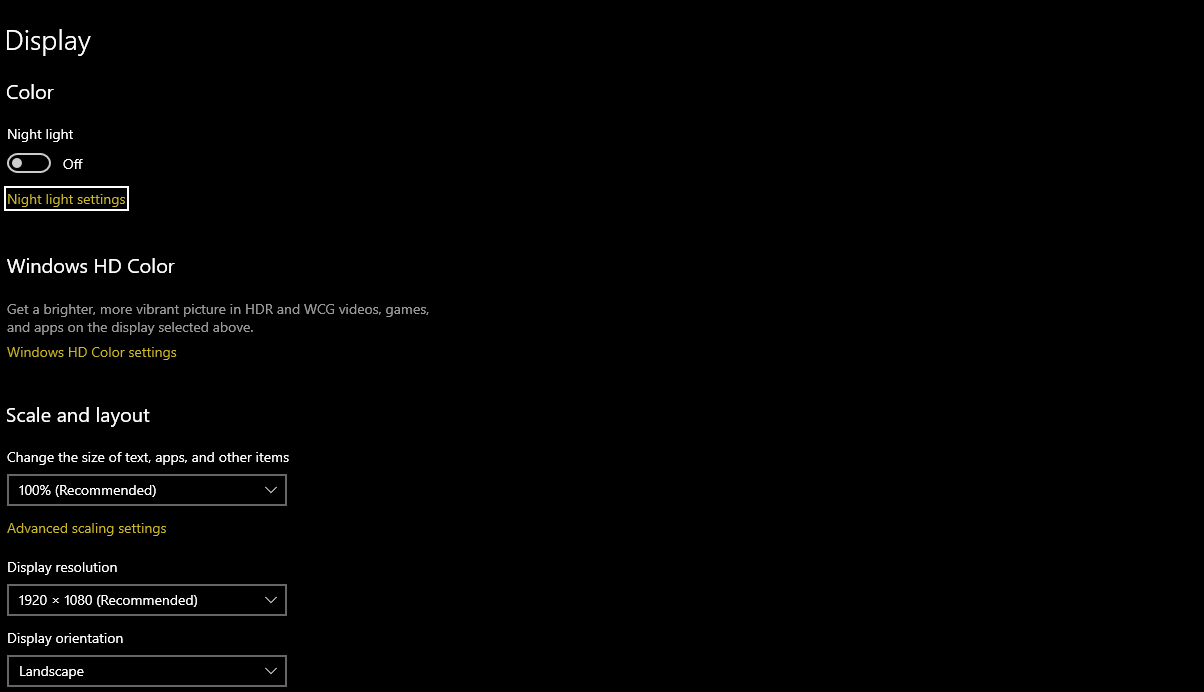
To adjust display scaling on a single monitor, press Windows Key + I to open the Settings panel, type display in the search bar, and select the first result. This will open up the Display Settings panel.
Now, under Display resolution, make sure the native resolution of your display is selected. For instance, if you are running a 1080p monitor, choose 1920 x 1080 from the dropdown list.
Next, look under Scale and layout and see what scaling factor Windows has applied by default. For a 1080p monitor, the scaling factor is set to 100%. For a 4K monitor, the factor is often set to 150%. If you are not happy with the default factor, change it to your liking.

If you want to enlarge the visuals, increase the factor. Conversely, if you want to make UI elements smaller, decrease it.
After changing the factor, be sure to Log off and Log on each time. Some parts of Windows don’t reflect the changes made to scaling until you have logged off and logged on again.
If none of the scaling options work well enough for you, click on Advanced scaling settings.
In the Advanced settings panel, select Let Windows try to fix apps so they are not blurry. As the name suggests, this setting enables automatic display scaling. This may not work well for all apps, especially if you operate multiple monitors.

Finally, if nothing works, you can try entering a custom scaling size in the field under Custom scaling. Remember, always try small increments first, as you can set a huge scaling size, making it difficult for you to locate the setting later.
Display Scaling Options for Discreet GPUs
Besides the built-in scaling settings in Windows, you can also tweak things further if you have a discreet AMD or Nvidia GPU. As these settings are geared more towards gamers, they are unlikely to resolve any significant scaling issues.
Display Scaling for AMD GPUs
If you are using an AMD GPU, right-click anywhere on the desktop and select AMD Radeon Software. Navigate to the Display tab. Under Display Options, make sure GPU Scaling is disabled, and Scaling Mode is set to Preserve aspect ratio.

GPU Scaling is used to upscale retro games to the native display resolution. Enabling it does little to no good for regular day-to-day use but introduces input lag. So, only enable it if you are going to be playing retro games.
Scaling Mode, on the other hand, handles how an image is displayed on the screen. Preserve aspect ratio preserves the aspect ratio of the image and doesn’t stretch the image to fit the display. This will introduce black bars around the image.
Center turns off image scaling of all kinds and just centers the image. Once again, black bars will appear around the image if the resolution doesn’t match your display.
Finally, Full Panel scaling mode stretches the image to fill the display.
Display Resolution for Nvidia GPUs
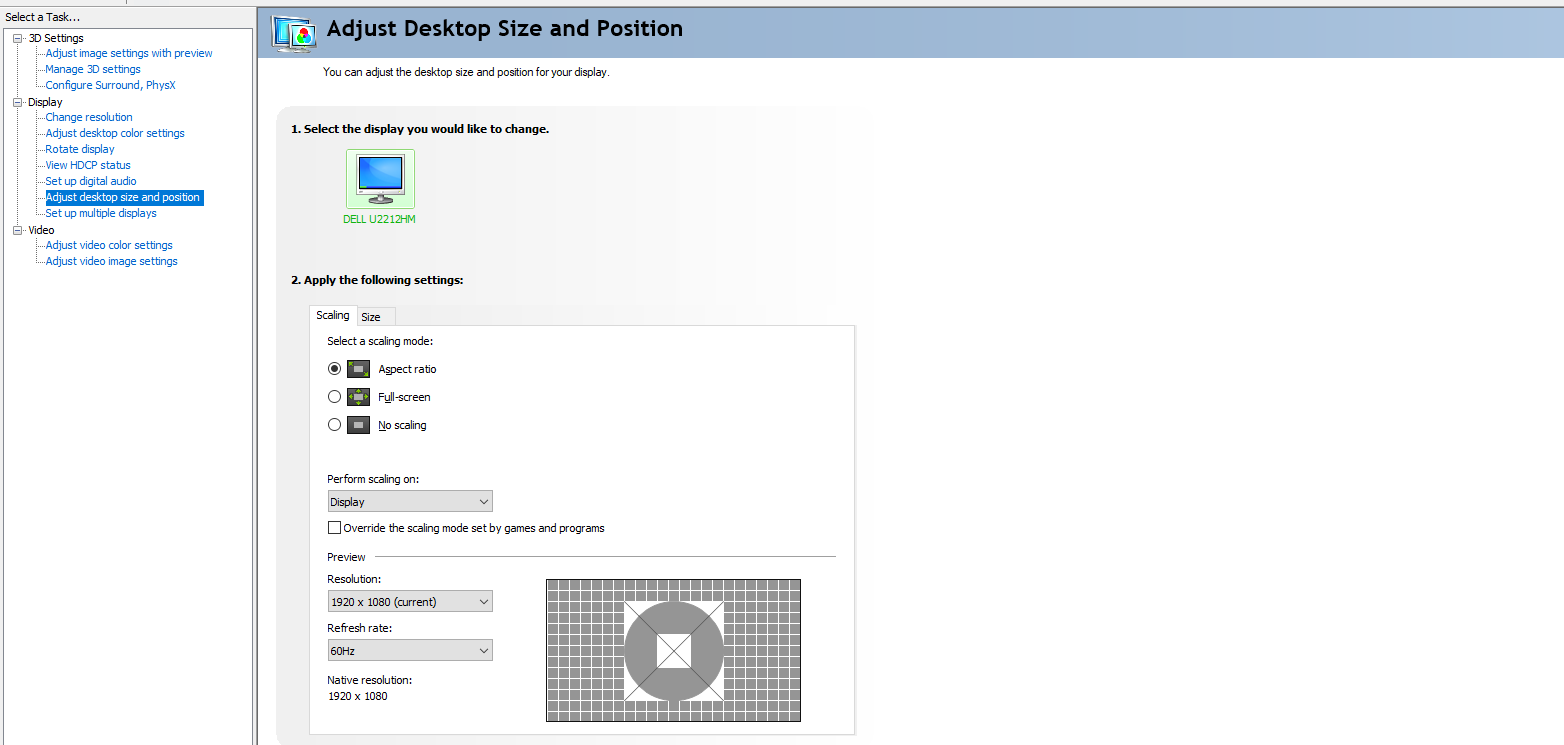
The procedure for Nvidia GPUs is almost the same as AMD GPUs. Right-click anywhere on the desktop and select Nvidia Control Panel.
Once you are in, navigate to Adjust desktop size and position located on the left-hand side under Display.

Next, select the scaling mode you want. Go with Aspect Ratio if you are not sure what to select as this is the default.
Display Scaling for a Multiple Monitor Setup
If you have multiple monitors of different sizes and resolutions, you are going to have to adjust each monitor individually. Otherwise, you can end up with proper scaling on one display and a jumbled mess on the other.
So, press Windows Key + I to open the Settings panel, type display in the search bar, and select the first result. Once you are in the Settings panel, select which monitor you want to configure at the top of the page. The rest of the steps are the same as mentioned above.
Don’t forget to log off and log on after changing the settings.
After configuring the monitor, drag a window over to that monitor and see if everything looks good.
Do the same for all monitors.
Display Scaling for Individual Programs
Even after you’ve tweaked every possible setting related to display scaling, some programs can still scale poorly. For instance, on 4K monitors, it is common for programs to have tiny, fuzzy text. To resolve this issue, you can leave scaling to the program itself.
Go to the folder where the program is installed, then right-click on the program’s icon and select Properties.
Next, click on Compatibility and then click on Change high DPI settings.
In the dialogue box that pops up, select Override high DPI scaling behavior and choose Application from the dropdown list. The Application setting allows the program to bypass system-wide scaling and define its own scaling parameters for high DPI monitors.

The Easy Way to Improve Display Scaling in Windows 10
Although the scaling settings don’t fix every problem that creeps up on high DPI monitors, you can fix a lot of the issues by going with the default settings. Windows has come a long way since its release. And things will get better as more and more people adopt high DPI monitors and multi-monitor setups.


