
The Blend If tool is a powerful feature in Photoshop that allows you to creatively blend layers together to showcase specific attributes of an image. This can be put to great use when color grading your work.
In this tutorial, we will explain what Blend If is and how to use it in combination with the Soft Light blend mode with HSL adjustment layers to color grade a portrait and a landscape image. We will also show you how to use the Color Balance tool to enhance your color grading as a last step.
What Is Blend If?
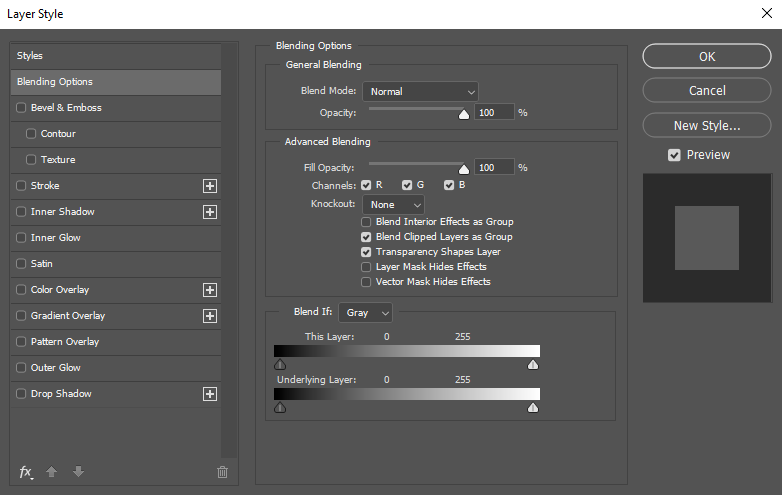
Blend If is a feature that affects the visibility of your target layers. There are two primary attributes you can blend. The default is set to Gray in the Blend If panel, which affects the luminosity. Used in this manner, you’re telling Photoshop to change the visibility of the highlights, shadows, and midtones of your target layers.
You can also access the Red, Green, and Blue channels (RGB) from the same dropdown menu to change how colors appear in target layers. In this case, you’re telling Photoshop to change the visibility of specific colors in your target layers.
The third aspect to Blend If is the actual blending capabilities. Whether you’re working with either luminosity or colors (or both), Blend If can be used to affect the visibility of these variables between two or more layers.
If you’re new to using Blend If, this short video will help you understand the basics, as well as demonstrate the above-mentioned features.
How to Access Blend If
The Blend If feature in Photoshop is located in the Layer Style menu. It can be accessed from the menu using this path: Layer > Layer Style > Blending Options.
You can also access Blend If by double-clicking on the layer you want to affect in Photoshop. This is probably the easiest and quickest way to do it. Just be careful to click to the right side of the layer name to avoid opening the change layer name option.
Our Recipe for Color Grading: Soft Light Blend Mode, HSL Adjustment Layers, and Blend If
We will be using this recipe in our workflow to edit the following portrait and landscape images. Essentially, the color grading will be performed by setting up Hue/Saturation layers (HSL) set to the Soft Light blend mode. Then, Blend If will be accessed in each of these layers to fine-tune luminosity and or RGB (color) values.
Color Grading a Portrait

Blend If can be used in very effective ways to change the color profile of a portrait. It helps to plan it out before editing because the level of control that you have with this technique allows for very precise adjustments.
For example, say we wanted to color grade for more natural skin tones while cooling down the shadows. This would be a common task for many different styles of portraits, especially where there is a strong color cast dominating the highlights and shadows, like in the below example.
This type of color grade can be achieved by creating two HSL layers, one for highlights (skin) and one for shadows. We’d then change the colors for our target areas and use Blend If to protect the regions that we don’t want to affect.
Let’s get started!
You can download this image from Pexels to follow along.
- Create a Hue/Saturation adjustment layer by clicking on the Create New Fill or Adjustment Layer icon at the bottom right of Photoshop.
- Check the Colorize box.
- Change the blend mode to Soft Light in the dropdown menu.
- Double-click on the text “Hue/Saturation” and rename the layer to Highlights.
- Double-click on the Hue/Saturation icon to access the sliders. Make the following adjustments: Hue: 39; Saturation: 0; Lightness: +55.
- Double-click on the Hue/Saturation layer, just to the right of the text, to access the Layer Style panel and the Blend If sliders.
- Press and hold Alt + Click on the left slider in Underlying Layer. Move both sliders so that the values are 31 and 99 as shown. Then, click OK.
- Repeat steps one through four. But this time in step four, rename the layer to Shadows.
- Double-click on the Hue/Saturation icon to access the sliders (if the box is closed). Make the following adjustments: Hue: 233; Saturation: 36; Lightness: -42.
- Double-click the Hue/Saturation Shadows layer to access the Layer Style panel. Press and hold Alt + Click on the right slider in Underlying Layer. Move both sliders so that the values are 22 and 113 as shown. Then, click OK.
- On the Shadows layer, change the Fill to 50 percent.
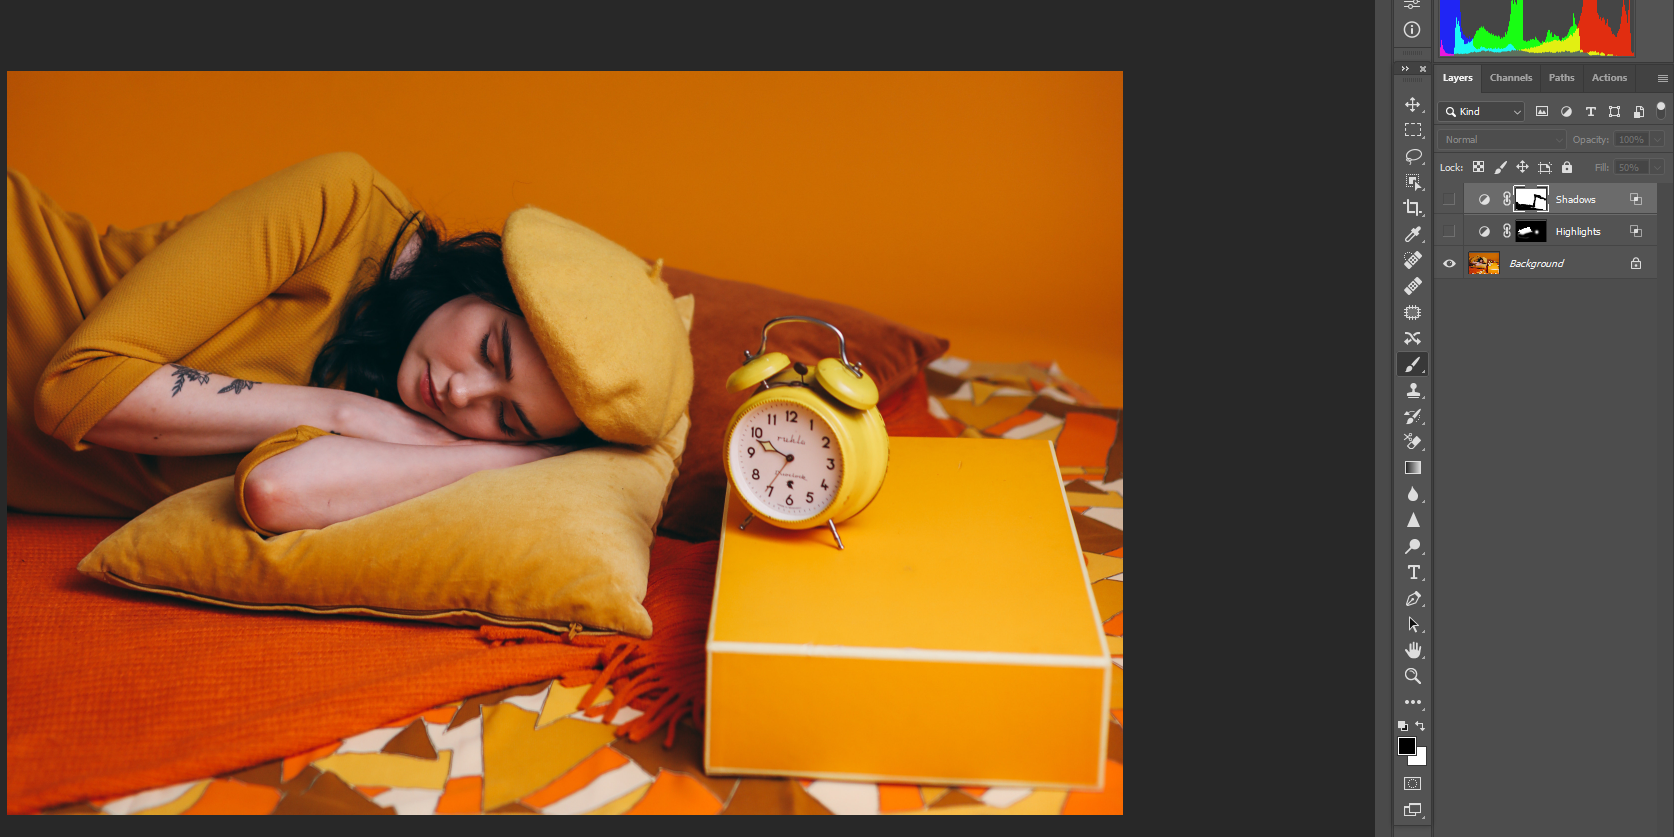
- Select the Highlights layer mask. Press B for the Brush tool and change the foreground color to Black. Then, paint in the original colors except for the skin areas, as shown. We cover the basics of the Brush tool if you need a refresher.
- Select the Shadows layer mask. Again, using the Brush tool as before, change the foreground color to black and paint in the shadow areas on the pillow and blanket. In this case, we want to keep only the affected regions on the woman
Before:
After:
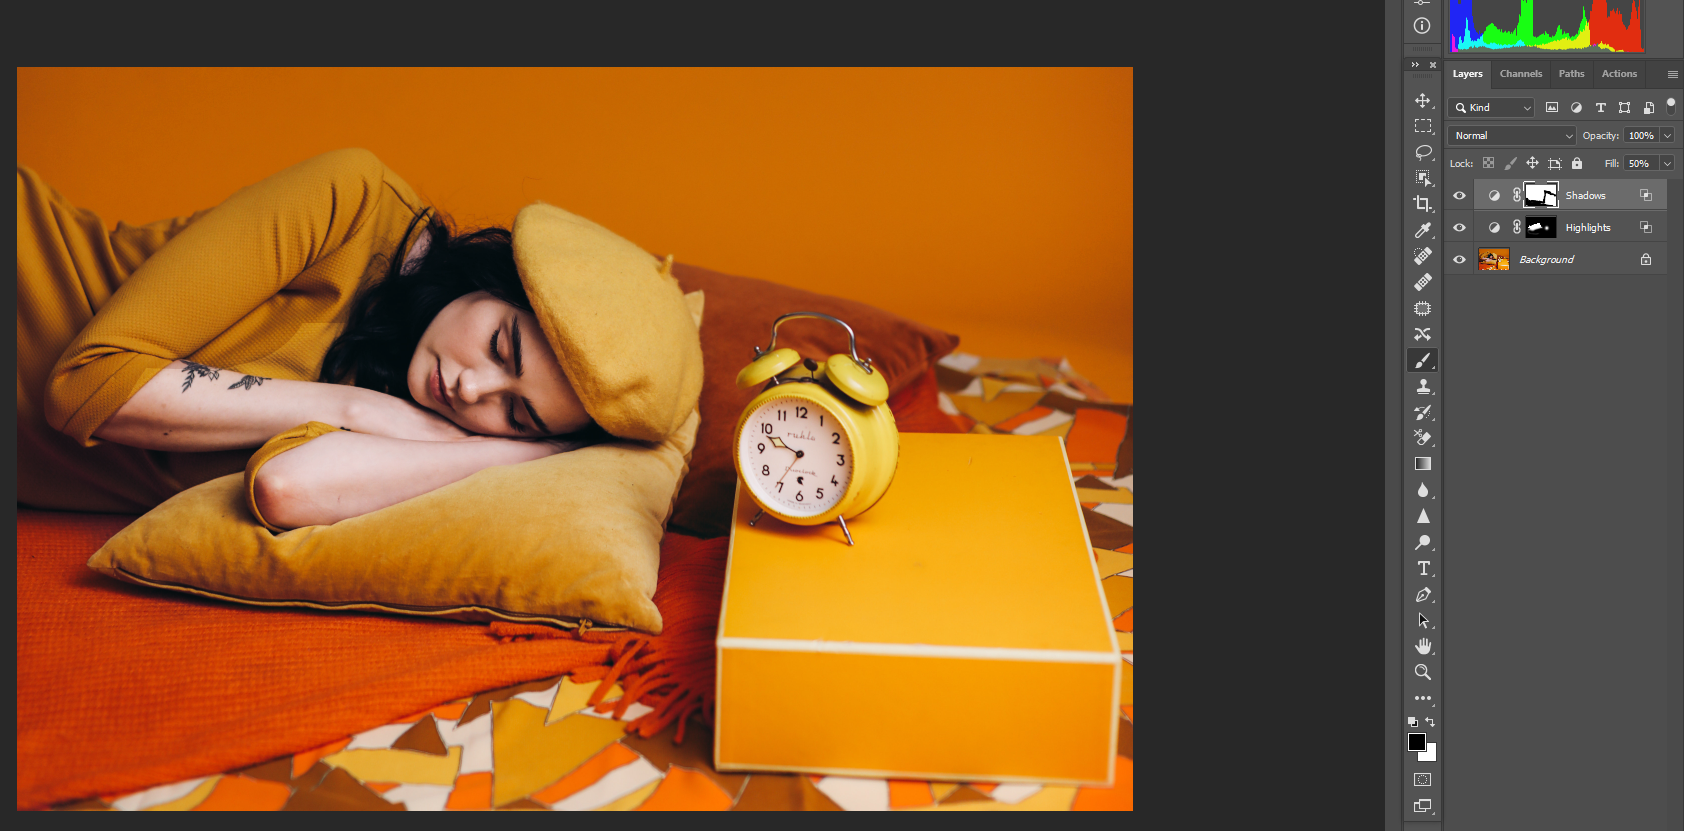
The result is a more natural-looking image now that we’ve corrected the skin tones and shadows on our subject.
Color Grading a Landscape Image

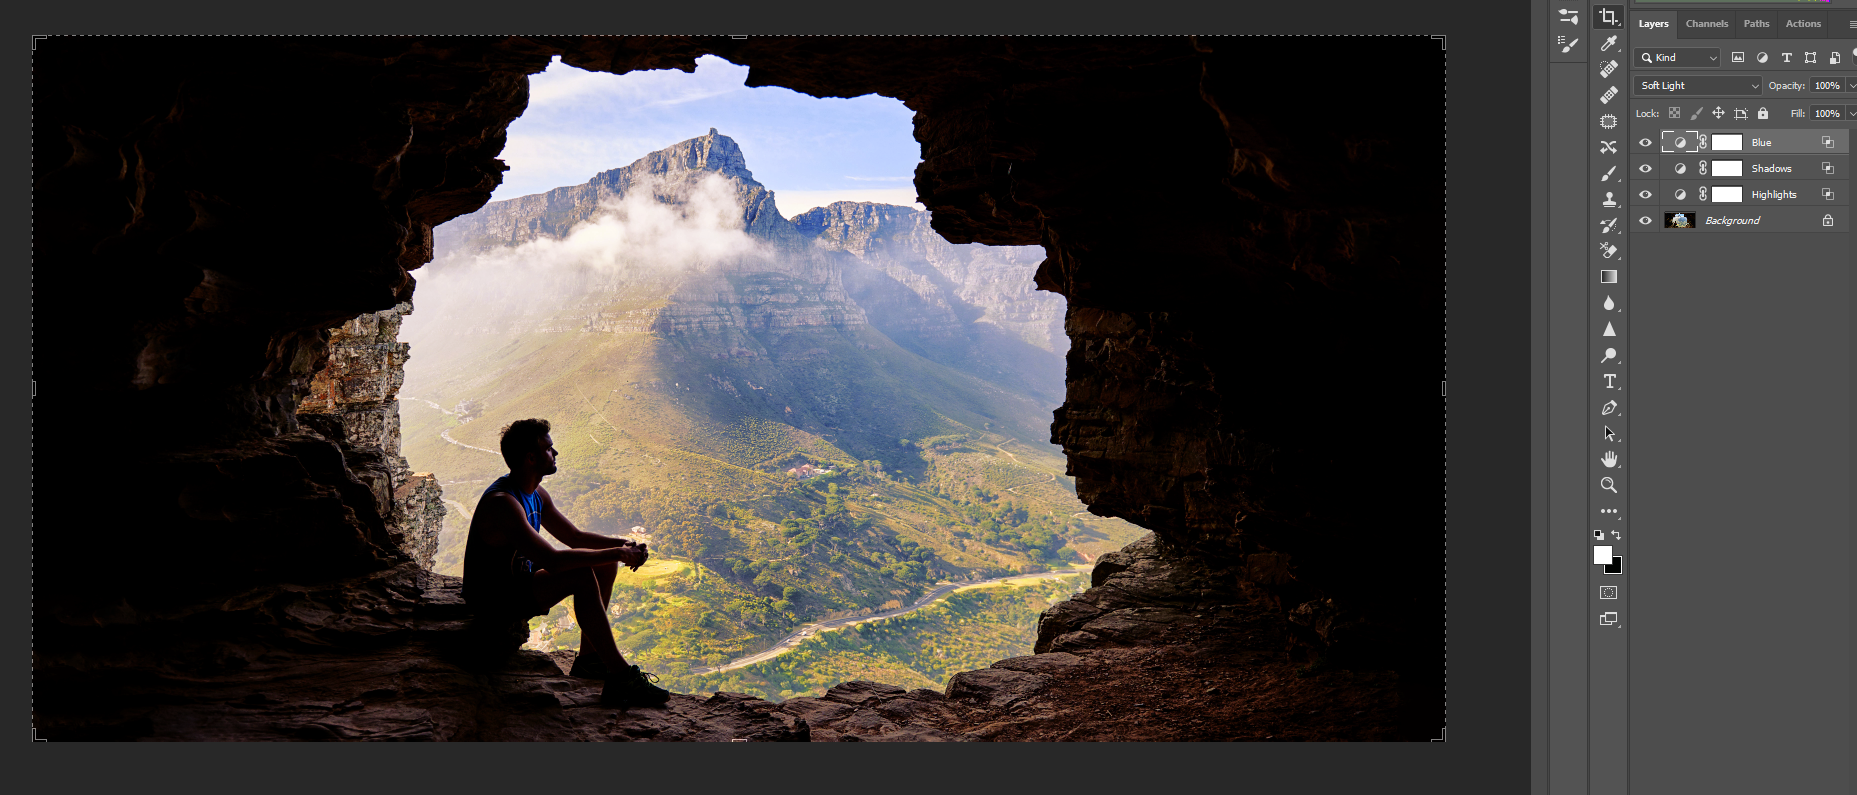
We will apply the same principles in this landscape image. We’ll add warmth to the scene outside the cave, as well as add blue and cyan to the shadows. This will create more contrast and a very different overall look and feel.
Additionally, we’ll also work with the Blue channel to show you how to use color in the Blend If panel. In this way, it’s possible to change not only the luminosity values using Gray but also the Blue channel, all in the same HSL-Blend If layer. This will make more sense in the later steps.
You can download this image from Pexels to follow along.
- Create a Hue/Saturation adjustment layer by clicking on the Create New Fill or Adjustment Layer icon at the bottom right of Photoshop.
- Check the Colorize box.
- Change the blend mode to Soft Light in the dropdown menu.
- Double-click on the text “Hue/Saturation” and rename the layer to Highlights.
- Double-click on the Hue/Saturation icon to access the sliders. Make the following adjustments: Hue: 12; Saturation: 45; Lightness: -25.
- Double-click on the Hue/Saturation layer, just to the right of the text to access the Layer Style panel and the Blend If sliders.
- Press and hold Alt + Click on the left slider in Underlying Layer. Move both sliders so that the values are 106 and 182 as shown. Then, click OK.
- Repeat steps one through four. But this time in step four, rename the layer to Shadows.
- Double-click on the Hue/Saturation icon to access the sliders. Make the following adjustments: Hue: 260; Saturation: 47; Lightness: -20.
- Double-click the Hue/Saturation Shadows layer to access the Layer Style panel. Press and hold Alt + Click on the right slider in Underlying Layer. Move both sliders so that the values are 50 and 130 as shown. Then, click OK.
- Repeat steps one through four. But this time in step four, rename the layer to Blue.
- Double-click on the Hue/Saturation icon to access the sliders. Make the following adjustments: Hue: 315; Saturation: 61; Lightness: -30.
- Double-click the Hue/Saturation Shadows layer to access the Layer Style panel. Change the Blend If dropdown menu to Blue.
- Press and hold Alt + Click on the left slider in Underlying Layer. Move both sliders so that the values are 175 and 255 as shown.
- Change the Blend If dropdown menu back to Gray.
- Press and hold Alt + Click on the left slider in Underlying Layer. Move both sliders so that the values are 175 and 255 as shown.
Before:
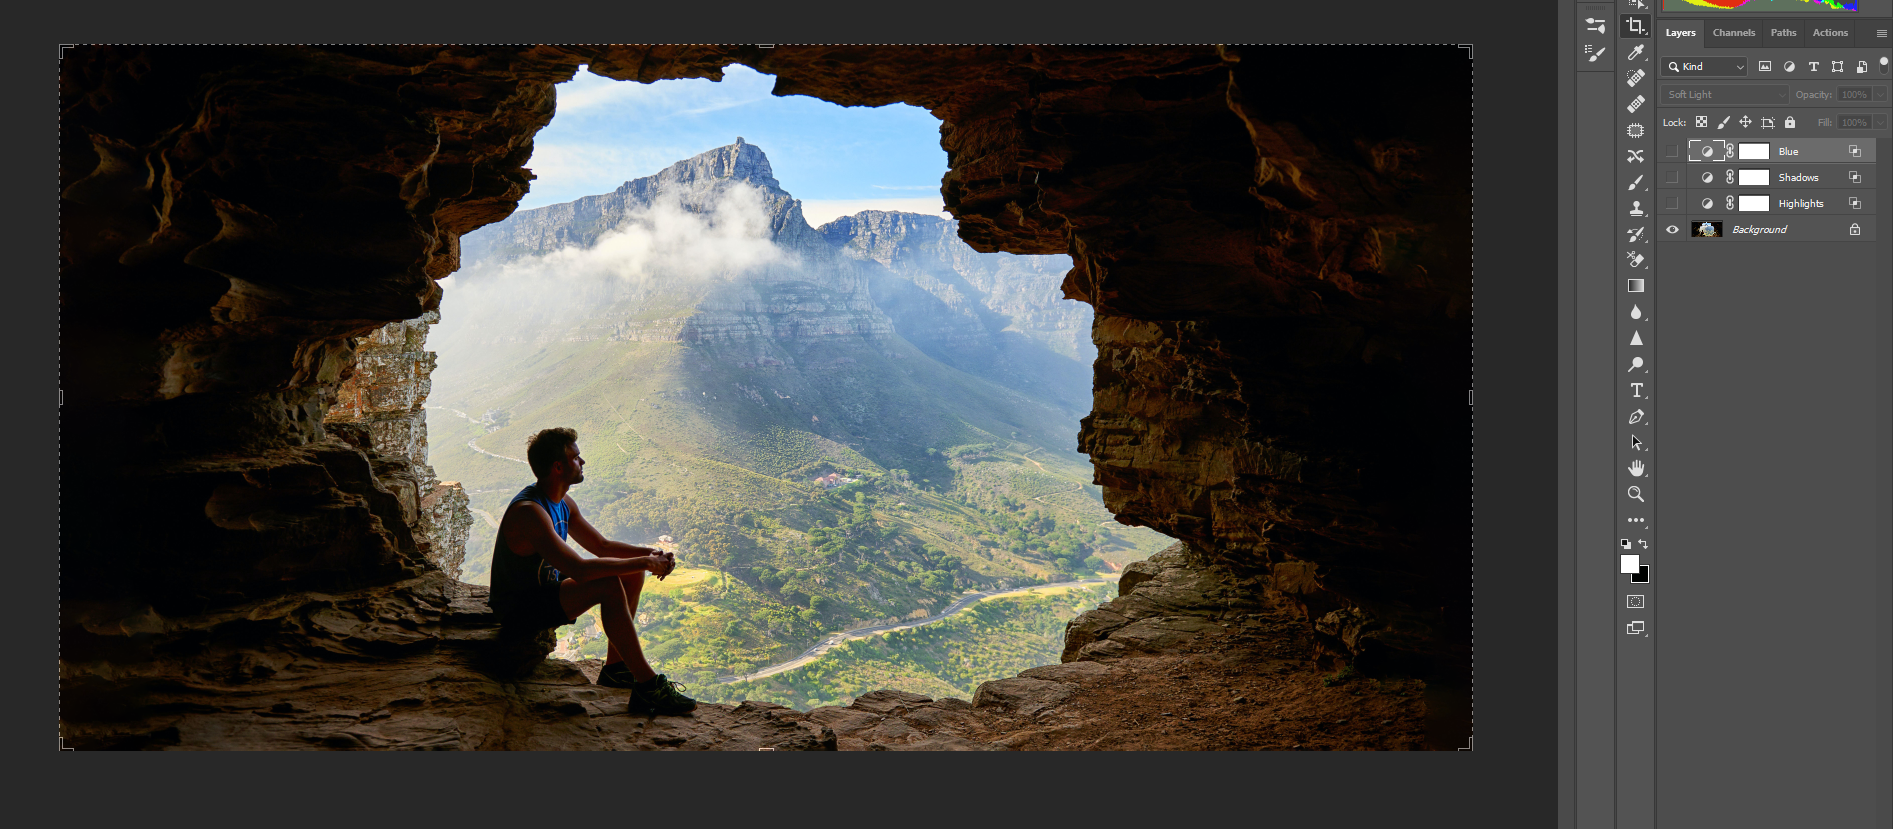
After:
Adding a Color Balance Adjustment Layer to the Landscape Edit
Once you get the hang of using HSL adjustment layers set to Soft Light in combination with Blend If, final touches can be added by working with the Color Balance tool. But as you will see, the Color Balance tool becomes a much more powerful tool when it’s used on top of a stack of Blend If layers. Why?
Because Blend If layers will change in response to their surrounding layers, just like normal adjustment layers. The difference is Blend If on its own is more sophisticated and allows for precise control of luminosity and colors, visually. Let’s see how this works using the same landscape image.
- Make a group of the HSL layers by selecting the Blue layer, and then press and hold Shift + Click on the Highlights layer. Then, click on the Folder icon at the bottom.
- Create a Color Balance adjustment layer by clicking on the menu item at the bottom-right corner of the Photoshop screen.
- Make the following adjustments to the values in Color Balance, from top to bottom, in each section: Midtones: +24, -9, -6; Shadows: -9, 0, +24; Highlights: +20, 0, -7.
Now, if you toggle between turning off the Group 1 folder and the Color Balance adjustment layer, you can see how different and effective Blend If is when stacking new adjustments on top of the Blend If layers.
The takeaway from this experiment is that color grading with Photoshop’s conventional tools alone isn’t as effective as when used in tandem with Blend If layers set to the Soft Light blend mode.
If you haven’t fully grasped the power of the Blend If tool, here’s a great video that covers these techniques. You’ll be able to see how it all comes together right before your eyes.
Blend If Is One of the Most Powerful Yet Under-Used Tools in Photoshop

While industry professionals have been aware of and using Blend If for years, many beginners and even intermediate users of Photoshop may not be aware of its existence— and what a powerful feature it is.
Blend If will change your outlook on color grading once you take up the challenge to master it. If you’ve managed to get to the end of this tutorial, you probably know this to be true, especially if you’ve been using other methods to color grade. The next step is to apply your knowledge of Blend If to other aspects of your post-processing. Color grading is just the tip of the iceberg for Blend If.
